Journal Entry Batch Instructions
Introduction
A journal batch acts like an electronic folder that holds one or more journal entries.
Summary of Steps to Create A Journal Batch
- Sign-on to the Oracle applications and select the "RIT - GL - JOURNAL ENTRY ONLY" responsibility from your list of responsibilities.
- Click on "Entry" from the "Journals" menu listed to the right of the list of responsibilities.
- The Navigator - RIT - GL - JOURNAL ENTRY ONLY screen will appear first. The "Enter Journals (RIT)" and "Final Journals" windows will open automatically on top of your Navigator screen.
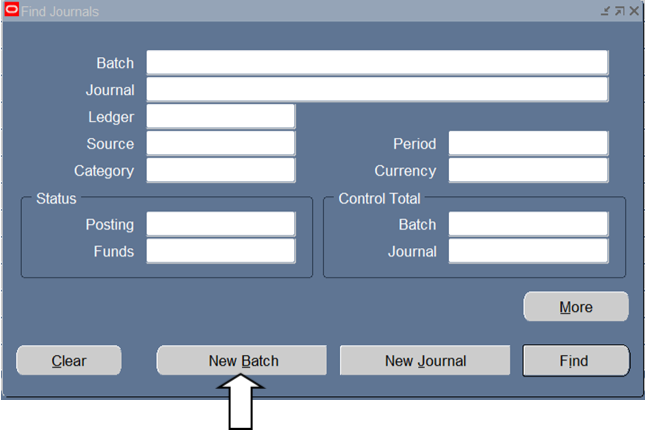
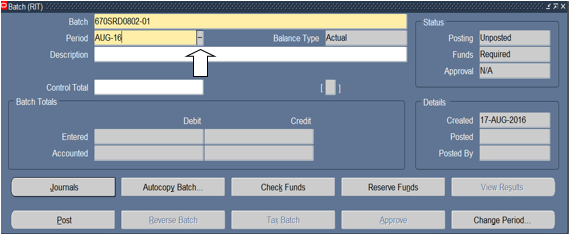
- Click once on the "New Batch" button. The Batch (RIT) screen opens.
- Make sure your cursor is positioned in the "Batch" field. Enter a new journal batch name using:
- three-digit department number
- three initials (UPPER CASE ONLY)
- today's date (MMDD format)
- batch number
- Press the Tab key to arrive in the "Period field". If the accounting period automatically displayed in this field is correct, press the Tab key once.
- If the desired accounting period is not shown, click in the List of Values field to the right of the Period field, to display the Periods screen. Select a period from the list by clicking once on it. Click once on "OK". The cursor will automatically jump to the "Description" field.
- In the "Description" field, type in a short and meaningful description of the journal batch.
Create a Journal Batch
- Sign-on to the system.
- Select "RIT - GL - JOURNAL ENTRY ONLY"
- From the "Journals" menu listed to the right of the list of responsibilities, click on "Entry".
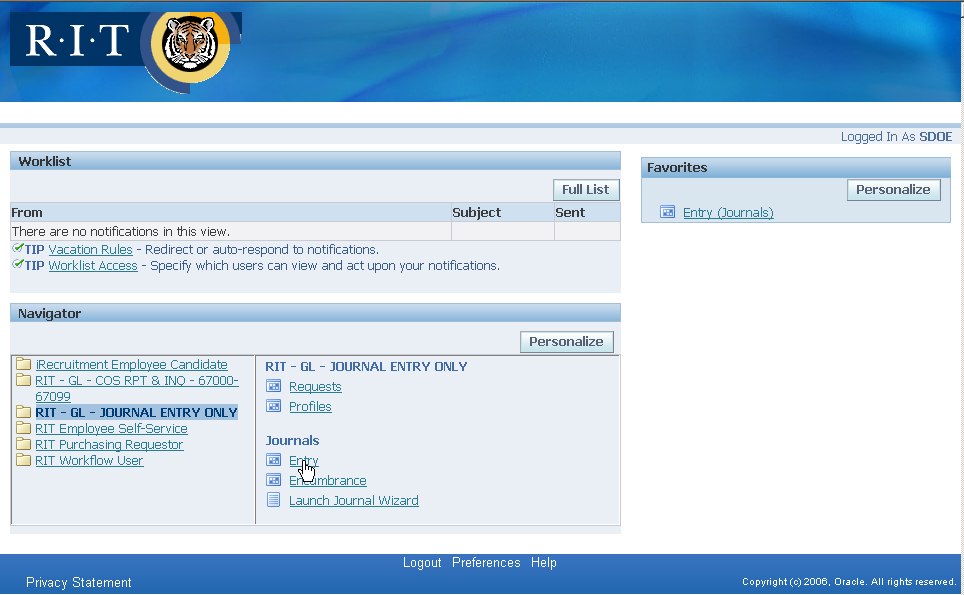
- Once in the applications the "Find Journals" windows will open automatically on top of your Navigator screen.
- In the Find Journals window, click once on the "New Batch" button.
The Batch (RIT) screen opens. The system has automatically filled in the "Period" and "Balance Type" fields. - Make sure your cursor is blinking in the "Batch" field. In the "Batch" field, type in:
- first three digits on the home department number
- three initials (must be in UPPER CASE so that Accounting can find your batch, if needed - use the letter "X" if you do not have a middle name)
- current month and day, in MMDD format, and "-01" to identify the first journal batch of the day. Subsequent journal batches are named "02", "03", etc.
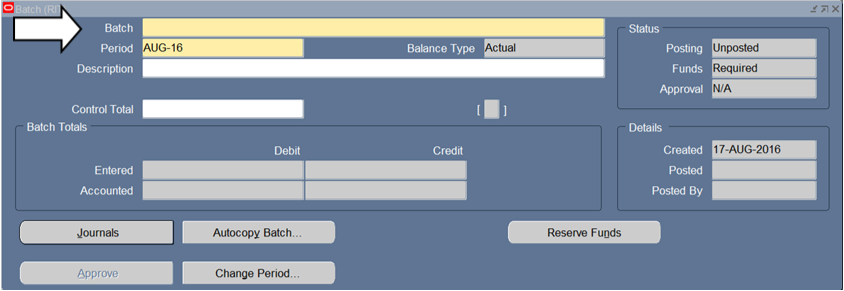
- Press the Tab key once to arrive in the "Period" field. Notice that the date is already filled in .
NOTE: All journal entries prepared within the first two days of a month that are to be posted in the prior month must be named as of the last day of the prior month. (e.g. a journal entry for JUL-17 created on 08/02/17 would require two steps: (1) change the "Period" from AUG-17 to JUL-17, and (2) name the entry DDDNNN0731-01. Additional JUL-17 entries to follow in numerical order using the same format DDDNNN0731-02, etc.
Change the Period
- Click on the LOV (List of Values) field.
This displays the Accounting Periods screen.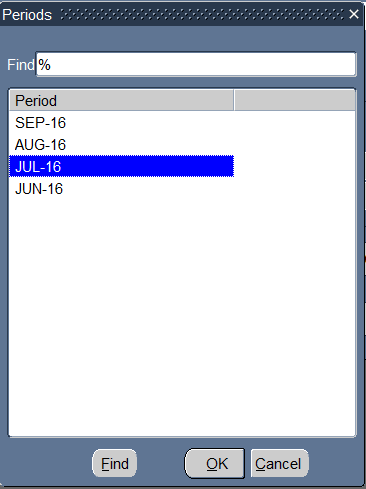
- Place your cursor on the "JUL-16" choice and click once.
- Click on "OK".
- The Batch screen appears with "JUL-16" in the "Period" field.
- Press the Tab key.
- System automatically defaults to a "Balance Type" of "Actual" and then skips to the "Description" field.
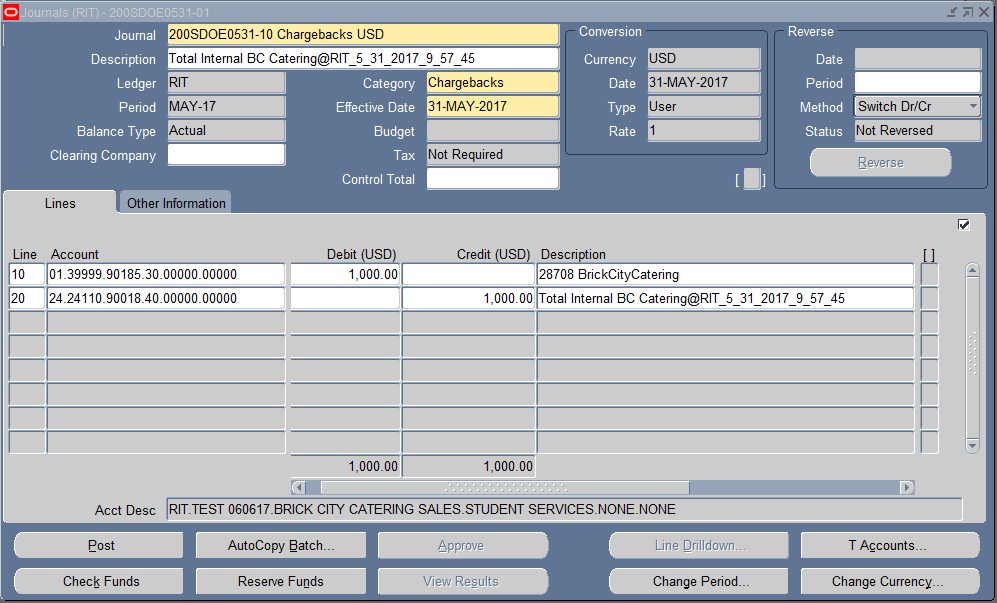
- In the "Description" field, type a description that reasonably represents your entry(s).
- (Optional) Tab to the "Control Total" field and type the dollar amount of all entries to be entered in the batch. This is useful to help check your work and will prevent Accounting Operations from posting the batch if not in balance.
NOTE: You must create at least one journal entry line within a batch before saving the batch. A journal batch without journal entries cannot be saved in the system. You will receive the error message below: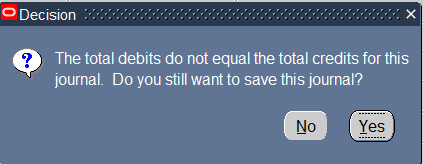
You can save an unbalanced journal entry (e.g. only one line entered) and return to it later in the day. Once you save your entry, choose the appropriate decision.