Game Consoles
Nintendo Wii
The Nintendo Wii will not connect to any RIT-provided wireless; there is an open case between Cisco and Nintendo to resolve this exact issue. In the meantime, Nintendo produces a wired Ethernet adapter that will work on the RIT wired network.
Wii Ethernet Adapter
- From the Wii Channel screen, select the "Wii" icon
- Go into "Wii Settings"
- On the second page find the fourth option "Internet" then go under "Console Information"
This screen should have a line with "USB Ethernet Adapter MAC Address" or "LAN Adapter MAC Address".
Once you have the device MAC address, you will need to perform a Manual Registration. After you add the device to your account, power down the device for approximately 20 minutes and then try connecting to the RIT wired network.
Nintendo Wii U
- Select "System Settings" from the Wii U home menu
- Select "Internet"
- Select "View MAC Address"
- Your MAC address will be displayed on this page
Once you have the device MAC address, you will need to perform a Manual Registration. After you add the device to your account, power down the device for approximately 20 minutes and then try connecting to the wireless network "RIT-Legacy".
If you have a LAN wired adapter compatible with the Wii U, perform a Manual Registration using the LAN wired MAC address of the console in order to connect to RIT wired internet.
Nintendo Switch
- Select "System Settings" from the Nintendo Switch home menu
- Select "Internet"
- Locate your MAC address under "Connection Status"
- Wireless Connection:
Once you have the device MAC address, you will need to perform a Manual Registration. After you add the device to your account, power down the device for approximately 20 minutes and then try connecting to the wireless network "RIT-Legacy".
Wired Connection:The Nintendo Switch is compatible with USB LAN adapters with the AX88772 or AX88179 chipset. If you have a USB LAN adapter compatible with the Nintendo Switch, perform a Manual Registration using the USB LAN adapter's wired MAC address in order to connect to RIT wired network.
- After you have connected to the RIT network, select the correct network and select "Test Connection"
- The system should display "Connection test was successful."
Nintendo 3DS
- Tap "System Settings" from the home menu
- Tap "Internet Settings"
- Tap "Other Information"
- Tap "Confirm MAC Address"
- Your MAC address will be displayed on this screen
Once you have the device MAC address, you will need to perform a Manual Registration. If you receive a message when attempting this that your device could not be found on the network, this is due to an issue with the way Nintendo has conigured networking on the Nintendo 3DS. Please contact ITS Resnet using the information on the right, and we will be happy to help you register your Nintendo 3DS manually. Please have your MAC address ready when you call. After you add the device to your account, power down the device forapproximately 20 minutes and then try connecting to the wireless network "RIT-Legacy".
PlayStation 3
From the PS3 main menu screen:
- Select "Settings"
- Select "System Settings"
- Select "System Information"
- Your MAC address will be displayed on this screen.
Once you have the device MAC address, you will need to perform a Manual Registration. After you add the device to your account, power down the device for approximately 20 minutes and then try connecting to the wireless network "RIT-Legacy" or to the RIT wired internet if you are connected via ethernet.
PlayStation 4
From the PS4 main menu Screen:
- From the Main Menu, go to the "Settings" Tab
- Select "System Settings"
- Select "System Information"
- This page will display your devices MAC address.
Once you have the device MAC address, you will need to perform a Manual Registration. After you add the device to your account, power down the device for approximately 20 minutes and then try connecting to the wireless network "RIT-Legacy".
If you want to connect to RIT wired internet, perform a Manual Registration using the LAN wired MAC address of the console.
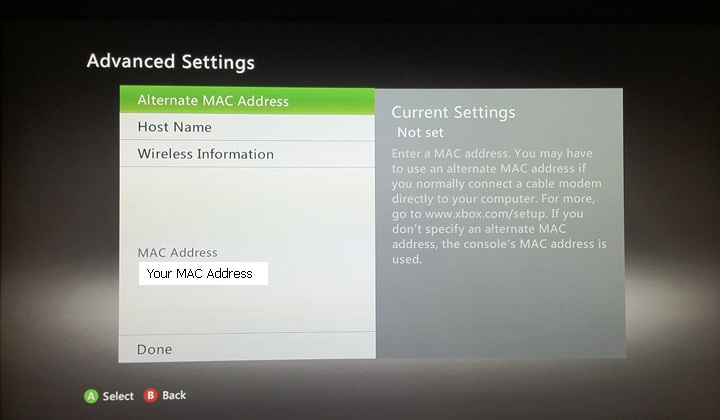
Xbox 360
- From the home screen, go to the Settings tab.
- Select System icon inside of the settings tab.
- Select Network Settings.
- Select "RIT-Legacy" from the Available Networks.
- Select Configure Network.
- Select the Additional Settings tab and hit Advanced Settings.

- Your MAC address will be listed towards the bottom of this page. This address will be used for registration.
Once you have the device MAC address, you will need to perform a Manual Registration. After you add the device to your account, power down the device for approximately 20 minutes and then try connecting to the wireless network "RIT-Legacy".
If you want to connect to RIT wired internet, select "Wired Connection" from the "Network Settings" page and repeat the steps above in order to get the wired MAC address. Perform a Manual Registration using the wired MAC address, power down the device for approximately 20 minutes, and then try connecting to the wired RIT network.
Xbox One
- Go to "My Games & Apps" from the Xbox home screen
- Select "Settings"
- Select "Network"
- Select "Advanced Settings"
- The MAC address is listed for both wired & wireless on this screen
Once you have the device MAC address, you will need to perform a Manual Registration. After you add the device to your account, power down the device for approximately 20 minutes and then try connecting to the wireless network "RIT-Legacy".
If you want to connect to RIT wired internet, perform a Manual Registration using the LAN wired MAC address of the console.