Oracle Compensation Workbench (CWB): Manager's User Guide for Performance and Merit Planning Cycle
Switch to Another Manager
Managers who have been given access in CWB can enter allocations for any employee who reports directly or indirectly to them, according to the supervisory hierarchy. Using the Switch Manager function, you can view and edit the information available to any manager within your security view.
Switch Manager enables you to act as another manager or as a super-user act on behalf of that manager, and do everything that the manager can do except view their notifications.
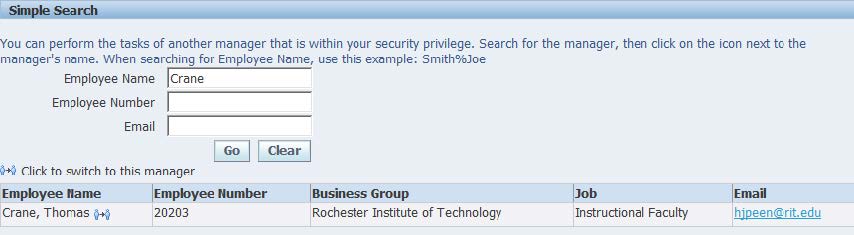
- Go to Compensation Workbench Home. To switch to a different Manager, select Search for a Manager in the Switch to Another Manager box on the right side of the screen.
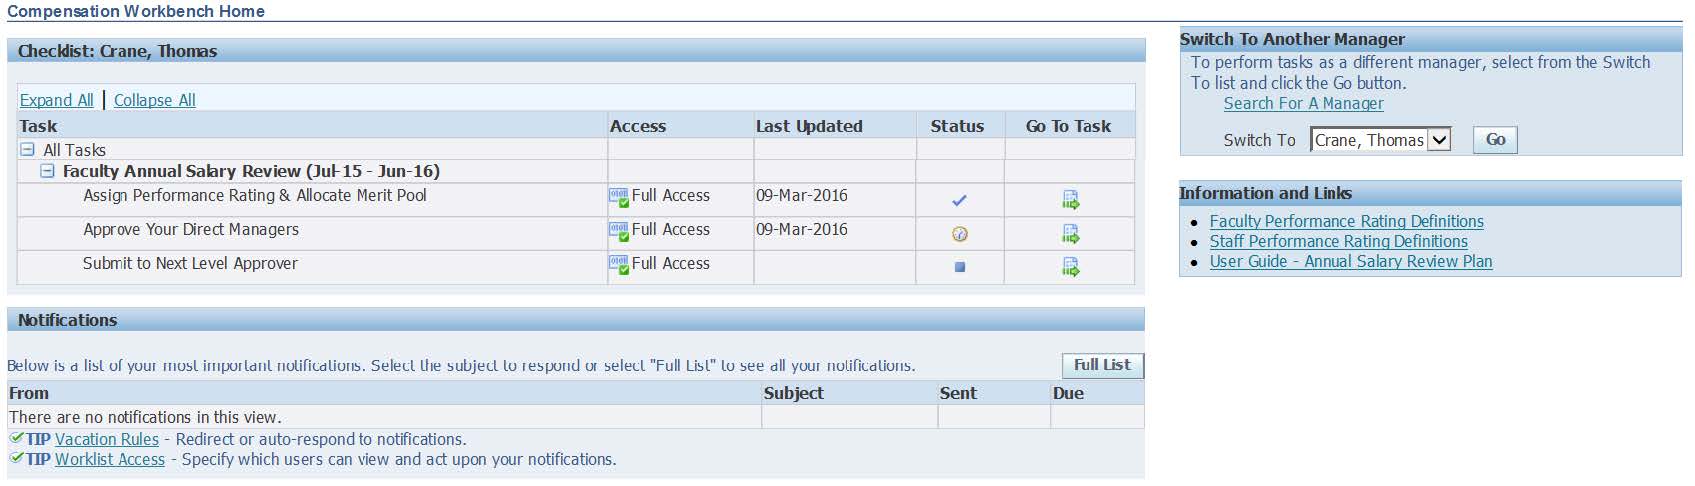
- Enter the employee name, number or email address of the employee who you want to change to.
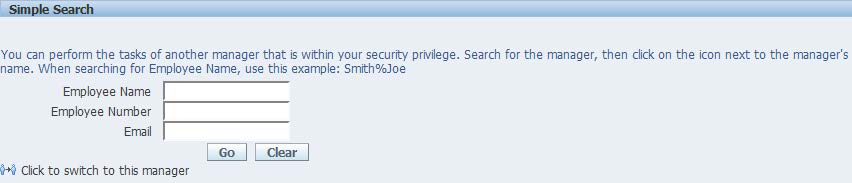
- Select the "person to person" icon next to the Manager's name. Notice that now you are acting as that Manager.
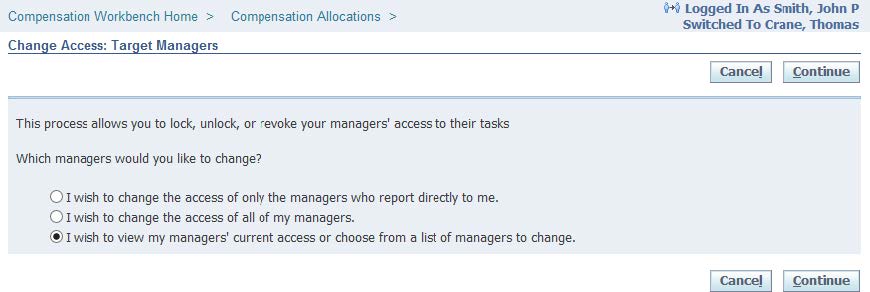
Change Manager Access (Optional)
Managers have the ability to delegate tasks to their subordinate managers through the supervisory chain by switching to the highest-level manager and then selecting managers within the hierarchy to change access.
**YOU WILL NEED TO COMPLETE THIS FOR EACH PLAN (FACULTY AND STAFF IF YOU HAVE BOTH)**
- Navigate to the ‘Assign Performance Rating & Allocate Merit Pool’ task for the ‘Faculty Annual Salary Plan’ plan on the CWB Home page.

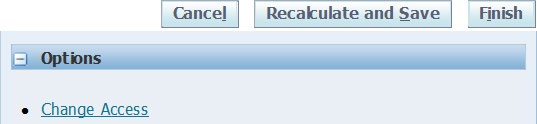
- Select the ‘Change Access’ link in the Options container.
- Select the option that allows you to view the current access and then change the access.
- Select each manager that you want to change access for and press ‘continue’.
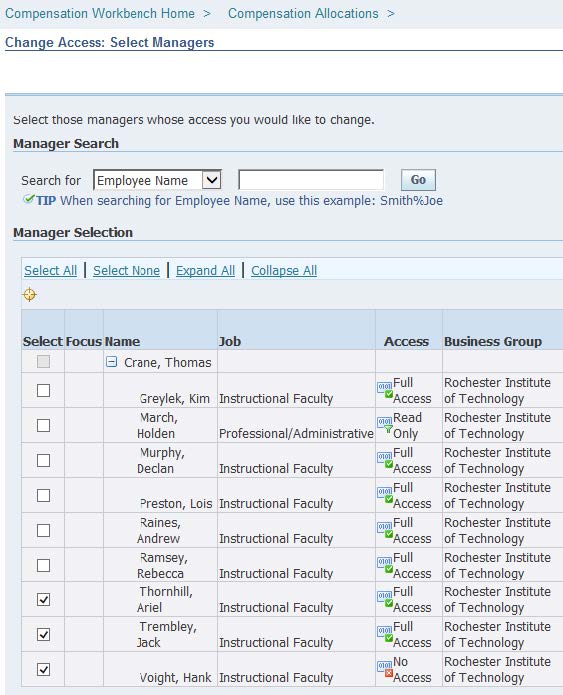
- Change managers currently with ‘any’ type of access to the type of access you wish to grant them. You can also choose whether or not you would like to notify those managers of their access.

- Press ‘Submit’ to change the manager’s access. This will change the manager’s access to CWB for this plan review period.
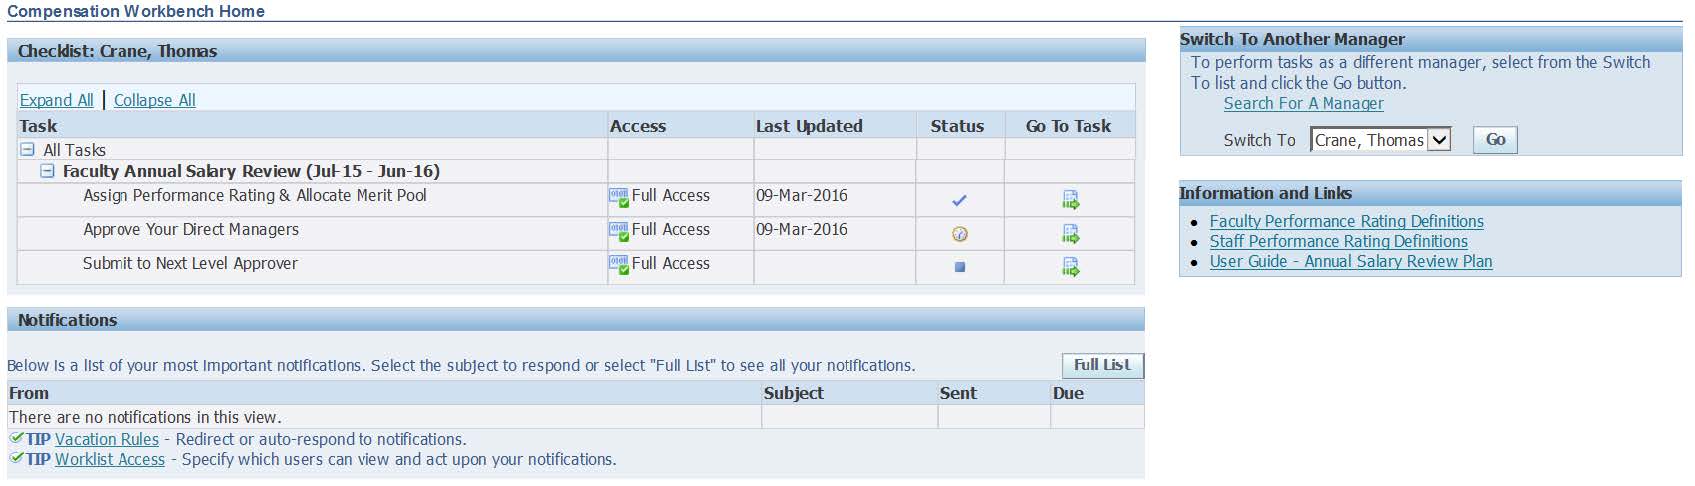
Entering Performance Rating and Merit Increases (Worksheet)
The ‘Assign Performance Rating & Allocate Merit Pool’ task (aka Worksheet), is where managers will assign the performance ratings and merit and market/EP monetary awards. Managers can work on direct employees, manager teams or ‘all employees’ within their supervisor hierarchy.
- Navigate to ‘Assign Performance Rating & Allocate Merit Pool’ within the Annual Salary Review plan. Click the icon in the Go To Task column.

The worksheet allows you to do the following:
- View summary totals for direct reports or team
- View information for direct employees, manager teams or ‘all employees’
- Press ‘Recalculate and Save’ to update the summary table
- Return to the CWB Home page by pressing the ‘Compensation Workbench Home’ in the upper left
- SAVE YOUR WORK AS YOU GO!!!!!!!
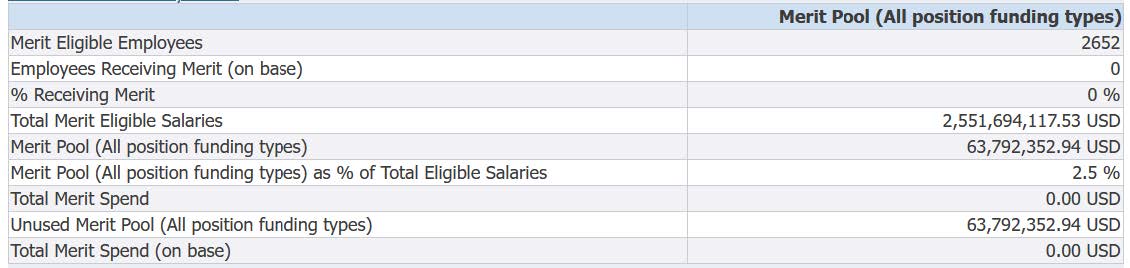

Compensation Summary Information

The summary information can be viewed for the entire ‘Team’ or by the manager’s ‘Direct Reports’. The summary information is specific to the manager that you are accessing. Please note that the summary information for salaries includes all salary information regardless of funding source.
Employee Allocations
The employee allocations section is where managers view and enter merit increases for eligible employees. Managers can choose to work with just ‘Direct Employees’, by subordinate manager teams or for ‘All Employees’ below them in the hierarchy. This can be changed using the drop down menu called Filters.
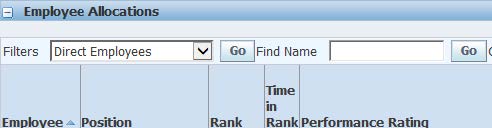
NOTE: Changing the display in the Employee Allocations section does NOT change the information reflected in the Summary table. Also, as data is entered in the ‘Employee Allocations’ press ‘Recalculate and Save’ to update the summary totals.
- Enter performance rating, merit increase, market/ep, compression and stipend/lump sum increase (if eligible) in the Employee Allocations section. You will be able to enter salary increases as either a dollar amount or % of eligible salary.
- Click into the next field or tab over and the columns will auto-calculate.
- To add comments or an attachment for an employee, click on the "paperclip" icon in the notes column.
*If entering Market/EP increase you must enter a reason in the notes column
REMINDER: make sure to periodically click “Recalculate and Save” to save information that you have entered and to recalculate the summary table at the top. This also allows you to save and return at a later time.

- Once your worksheet is completed, save and click ‘Finish’. This will mark the task complete and you can now submit to the next level for approval.
CWB Reporting
Compensation Workbench reporting is available to download employee CWB saved data input (in real time) and additional employee information that is not included in the CWB worksheet view. This is provided to managers as a way to do additional analysis during the merit planning cycle outside of the CWB tool.
- In the upper right-hand corner, click on “Home”.

- Navigate to your CWB responsibility or RIT Supervisor Self Serve.
- Under ‘Manager Self Service and Reporting: Reports (EiS)’ select the CWB report you would like download.
- On the ‘Report Submit’ page, click submit to receive all eligible employees within your security view or enter additional parameters to narrow your report to specific groups.

- In the ‘Worksheet’ reports, you will need to enter the ‘Switch to Manager’ and whether the report should contain All or only Direct Reports before clicking ‘Submit’:

- In the ‘Worksheet’ reports, you will need to enter the ‘Switch to Manager’ and whether the report should contain All or only Direct Reports before clicking ‘Submit’:
- Click on ‘Excel’ in the Outputs container (on the right).

Approve Your Direct Managers
If CWB access is granted to all level managers in your organization, this task allows a manager to approve or reject the work of direct reporting managers after the reporting manager has submitted for approval. The manager can do the following on this task:
- View status of each direct reporting manager.
- Review summary spending for manager’s team.
- View Details of how the manager’s team allocated rewards to each employee.
- Compare summary spending against other direct reporting managers.
- Approve or Reject manager work.
In Compensation Workbench Home, navigate to the ‘Approve Your Direct Managers’ task. Under the Go to Task column, click the icon.

Navigate to the ‘Review and Approve’ icon to view a summary of the manager’s spending and to compare managers.

You can view the summary totals, of the manager’s entire team, for Merit Pool. You can also navigate directly to the managers worksheet to see how each employee was compensated by pressing the ‘View Details’ button (above the bar graph). You can change manager by selecting a manager from the ‘Jump to Manager’ drop down and can compare manager total budget and spending in order to make an approval decision.
Finally, you can approve or reject the work of a direct reporting manager.
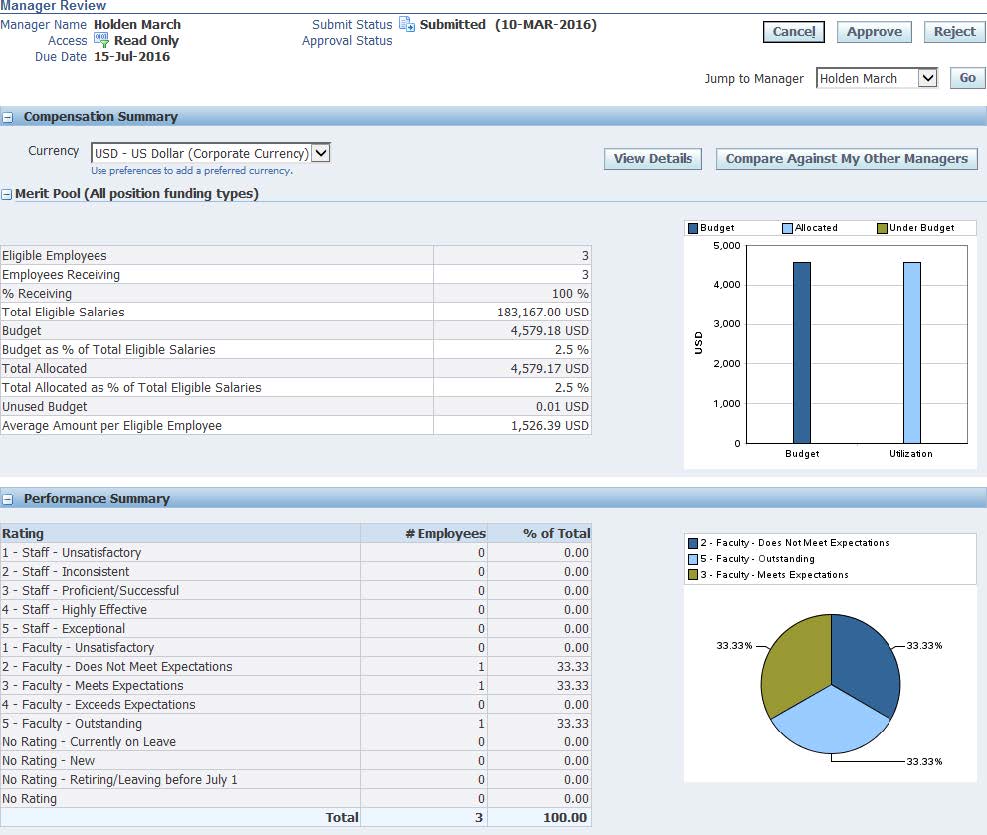
The ‘Compare Against My Other Managers’ button (above the bar graph) allows you to view summary spending across direct reporting managers.

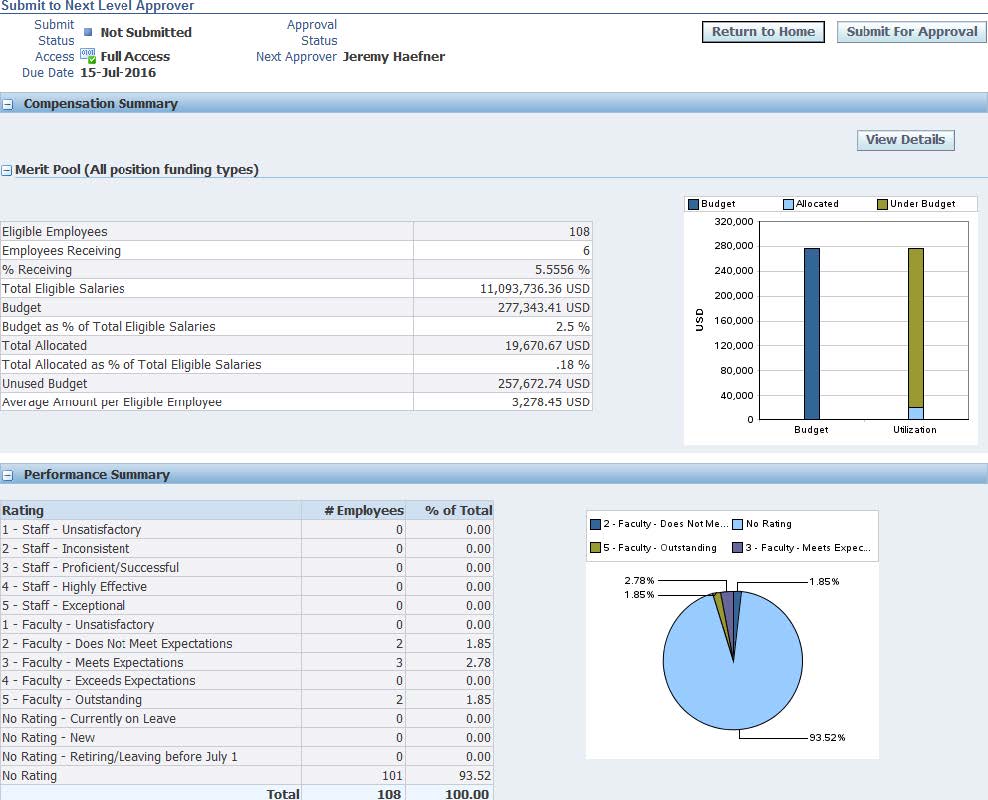
Submit to Next Level Approver
NOTE: STOP HERE IF YOU ARE WORKING ON BEHALF OF A DIRECTOR/DEAN OF AN ORGANIZATION!
- Log out of Oracle.
- Have Director/Dean log into their Oracle account and access Compensation Workbench by going to: RIT Supervisor Self Serve -> Manager Salary Planning -> Compensation Workbench
- Follow ‘Submit to Next Level Approver’ instructions below.
This task allows a manager to submit the work of the entire team up to the next level manager for approval. Click the icon in the Go to Task column for Submit to Next Level Approver. The manager can do the following on this task:
- View summary spending for manager’s team.
- View Details of how the manager’s team allocated rewards to each employee.
- View next level manager.
- Submit for Approval
Note: Once the manager submits for approval by clicking Submit For Approval button on the top right, the entire team becomes ‘Read Only’. The submitting manager can ‘Recall’ their work on this task, provided the approving manager has not already approved.