ActivePay Cardholder Guide
Introduction
This guide will assist you with navigating through the ActivePay website. This document will walk through your first login, what to do if you forget your password, as well as detailed instructions for the pages that you will be frequenting the most. This guide will cover both Cardholder and Approver steps for transaction management. Your organization may not use all of the features covered in this document. Please refer to the Table of Contents to skip to the sections that pertain to your organization. If you are unsure, please see your program administrator for your organization’s policy.
Log In
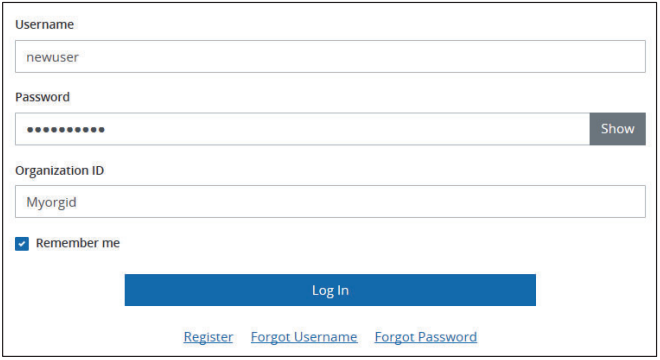
Your program administrator will provide you with your Username, Password and Organization ID or you may have received two emails containing your login credentials. The Username and Organization ID are not case sensitive.
First time log in
- Go to www.pncactivepay.com.
- Enter the login credentials provided to you. a. Select “Remember me” so the website will save your Username and Organization ID.
- Request a security code. The security code will be emailed to the email address provided by your program administrator OR if a cellular number has been provided for your account, you will have the option to have the security code sent via text.
- Enter your password and the security code.
- Accept the Terms and Conditions.
- Enter and Confirm your new password.
- Verify/edit your personal information i.e. first, middle and last name plus email address.
- Select and answer your challenge questions. You will need this if you have to reset your password via the website. We encourage our users to keep their passwords and the answers to their security questions in a safe place. Click Continue.
Forgot your password?
- Go to www.pncactivepay.com.
- Click on Forgot Password.
- You will need to know your Username, email address associated with your username and the Organization ID.
- Enter required information and click Verify Account.
- You will be prompted to answer your challenge questions.
- Enter your answers, click Validate Account.
- Enter a new password, confirm new password.
- Click Reset Password.
Note: If you are not able to create a new password using this method please contact your program administrator, as they will be able to reset or create a new password for you.
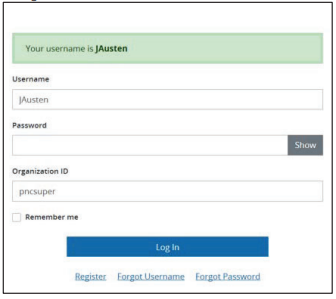
Forgot Username?
In order to retrieve your username you will need the following information:
- Organization ID
- Name on card
- Card number
- Unique identifier
If you do not have all of the above information, please contact your program administrator.
- Go to www.pncactivepay.com.
- Click on Forgot Username on the login screen.
- Enter all of your information, click Retrieve Username.
- The application will validate your information and display a log in screen with your username highlighted in green.
Home Page Review
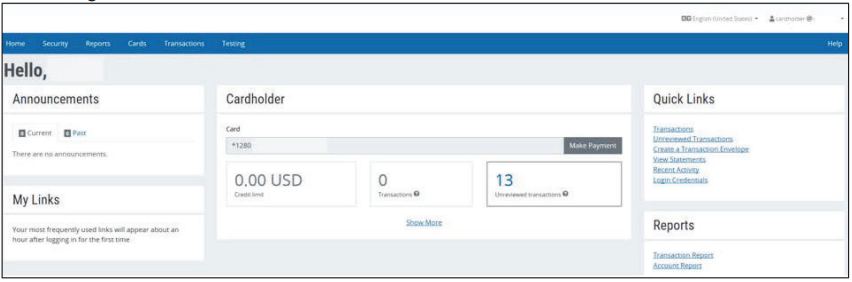
a. Announcements: This is where both your company’s administrators and the bank are able to post messages to notify you of upcoming deadlines or other information
b. My Links: This will populate with your most used pages as you use the website.
c. Quick Links: This provides you with quick links to pages otherwise found in the main menu across the top.
d. Reports: Provides links to commonly used reports.
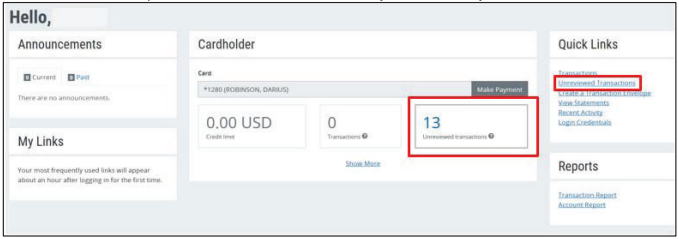
e. Cardholder: If you have a card(s) assigned to you, it will be displayed in the middle of the page.
- Displays Credit limit and number of transactions.
- Some optional features shown here are Make Payment if you are responsible for paying your own card balance and “Unreviewed transactions”, if your organization has opted to perform transaction coding.
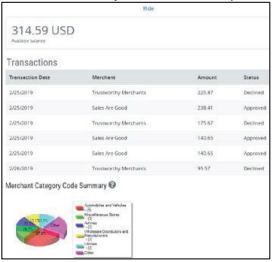
- Click on Show More to see your current available balance, the last 7 authorizations and declines, and a breakdown of your individual spend by merchant category code.
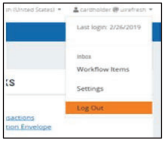
f. Hover over your username on the top right hand corner to edit your individual settings and Log Out. Please note that the application will log you out after 15 minutes of inactivity. You will see a pop-up to refresh your session prior to the log out.
Cardholder
Your card based transactions will be displayed in Transaction Management. Please note that a transaction date and a posting date are different. A posting date is when the transaction was actually processed whereas a transaction date is the date the transaction occurred (the day you used your card). This document is intended to guide a user through the basic functions of coding a transaction via ActivePay, using Transaction Management. This guide is not specific to any one organization’s configuration but the procedural steps are universal.
Transaction Management
Reviewing and Coding a Transaction
- There are two simple ways from the home page to access this information. Click the number link within the Cardholder section of the home page, or click the Unreviewed Transactions link under Quick Links. This will provide the list of transactions you have not yet reviewed in the last 30 days.
- If you have unreviewed transactions older than the last 30 days, use the Transactions link within Quick Links to navigate to the page and perform a search for a larger date range.
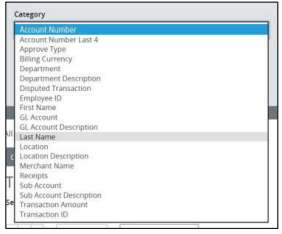
- If using the unreviewed transactions link, your results will display automatically, however you may also use the Search Criteria section to further narrow or widen your search results. Use the Date range drop down to lengthen your search range, or use the Category to add transaction related specifics if attempting to find a specific transaction or merchant.

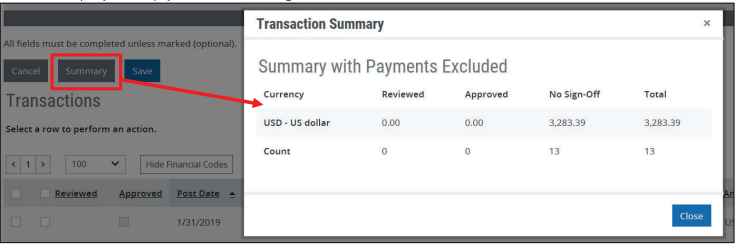
- One the desired results are loaded, you can click Summary to view the number of transactions and the total dollar amount. A pop-up containing a summary of the transactions within the defined date period will display. Simply click Close to go back to transactions.
- To select a transaction, simply click on it. Once a transaction is selected a series of options will be displayed at the top of the Transaction Grid.

- Merchant Details allows you to see details like merchant name, phone number, address, and MCC as passed via the Visa network.
- Billing Details allows you to see information such as the Billing and Tax amounts associated with the transaction. If any reference numbers or IDs are passed by the merchant, those will be found here.
- Transaction Details will redirect you to the detail page behind the transaction grid, and allow you to collapse or expand all sections like Merchant and Billing Details, Workflow, and Split Transactions.
- Split Transaction will redirect you to the detail page behind the transaction grid directly to the area for splitting transactions. This is covered in more detail on pages 5 and 6.
- Receipts will open a pop-up where you may upload a receipt.
- Copy Financial Codes/Clear Financial Codes allow you to copy the same coding combination to all or some of your other transactions on the grid, or remove coding from multiple transactions. Use the left most checkbox to select which transactions to copy/clear. This is covered in more detail later on page 4.
- Copy Notes/Clear Notes allow you to copy the same Note to all or some of your other transactions on the grid, or remove the Note from multiple transactions. Use the left most checkbox to select which transactions to copy/clear.
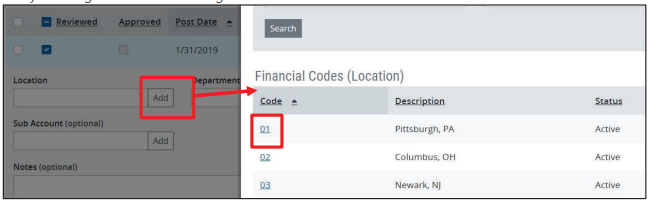
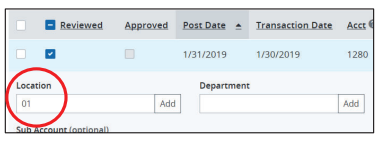
- To begin reviewing and coding your transactions, click the Reviewed checkbox beside the transaction you wish to work. Either type or search for a financial code. Please note, some codes may be populated by default. If there are no changes needed, then simply move to the next code field. To search for your company’s financial code values click on Add next to the financial code segment. A pop-up with a search bar appears with a list of your approved codes. Once the correct code is found, simply click the code. This will populate into the code box and auto-close the pop-up. Repeat for all code segments per your organization’s configuration.
Best Practice:
If you have codes that apply to all transactions, such as Cost Center, Location, Department, etc, enter those codes first. Then use the Copy Financial Codes feature to add those same codes to all transactions. Select the box to the far left of the transaction you wish to copy to or use the top box to select all. Then click Copy Financial Codes. This can also be completed for transactions with the same GL Coding, such as hotels, supplies, airlines, etc. by selecting those individual transactions and highlighting the transaction you wish to copy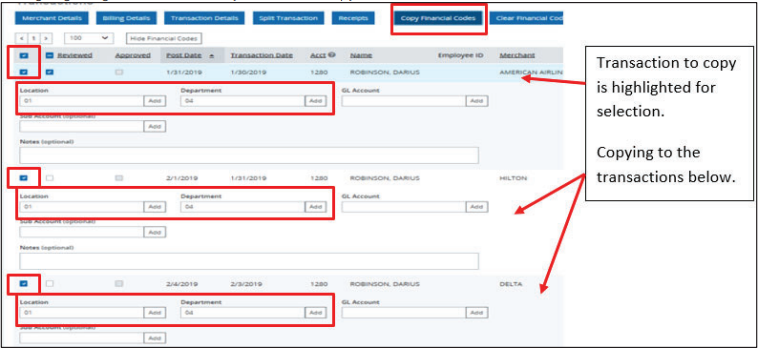
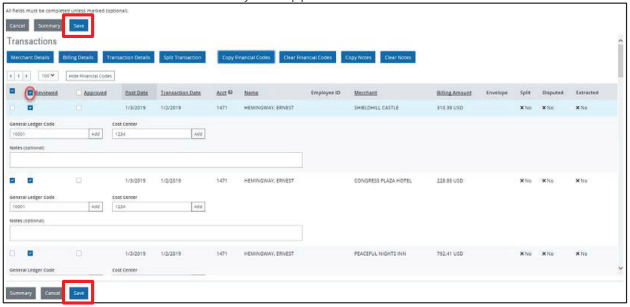
- Ensure the Reviewed check box is selected by each transaction you wish to mark as Reviewed, then click Save at the top or the bottom of the page. If your organization uses an Approval process, this will move the transactions on to your approver.
Splitting Transactions
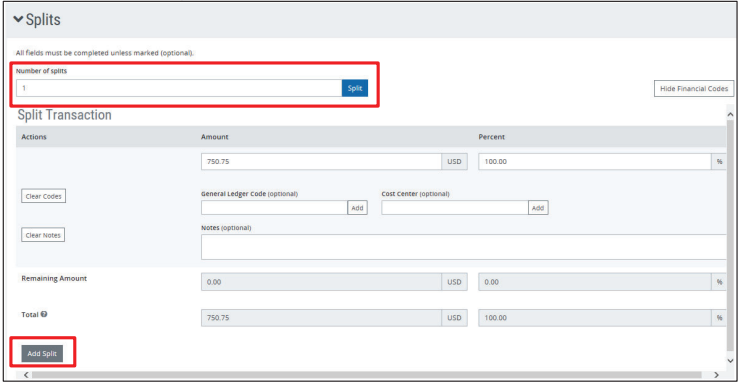
- To split a transaction, click on Split Transaction at the top of the transaction grid. If you have not yet saved your other coding, please ensure to do so before leaving the page. This will bring you to the Splits section of Transaction Details.
- You may enter the number of splits at the top then click the Split button, or the Add Split button on the bottom to add one split at a time. You can divide the transaction by amount or by percentage. Choose your coding the same way, by either entering the value or searching with the Add button to display a pop-up with your organization’s financial codes.
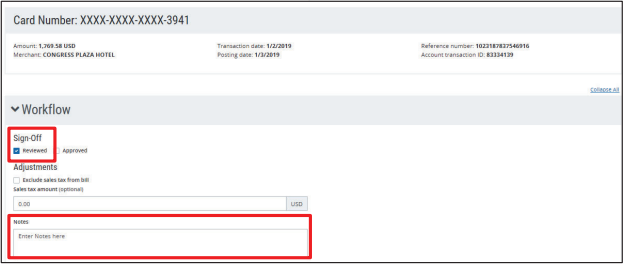
- The Reviewed flag should be checked and the Notes field populated (if required by your organization) under the Workflow section of the page.
- Save the Transaction Coding.
- Scroll to the top of the screen and use Next to forward on to the next transaction in the list OR use Back to Search to see more transactions
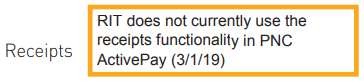
*Not every organization uses receipt management in ActivePay, if your organization does, this section contains instructions on how to upload and view your receipts. For information on your organization’s policy on receipt and receipt management please contact your Program Administrator.
- Within the Transaction Grid, select the transaction. Receipts will show as one of the buttons across the top of the grid.
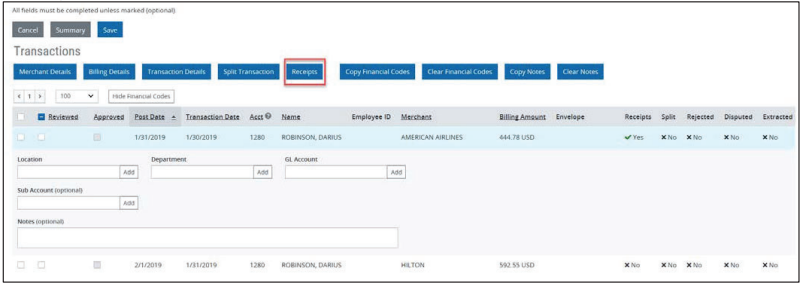
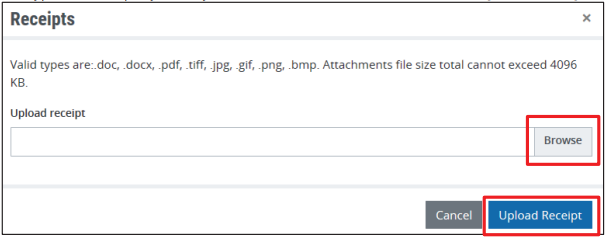
- Click on Receipts and use the Browse button to select the receipt you wish to upload. Please note the valid types of receipts you may attach and the size limitations. Click Upload Receipt.
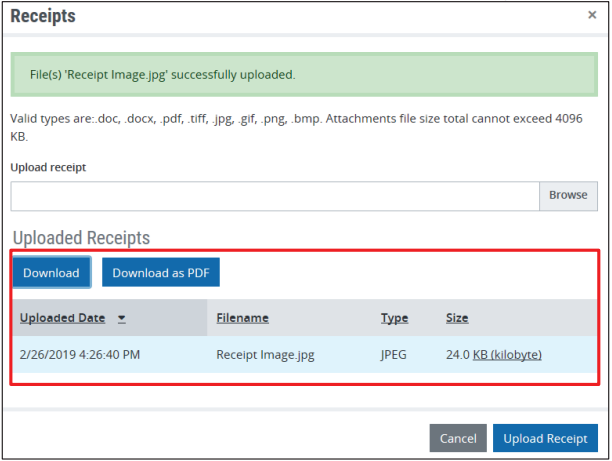
- You will receive a success message once the receipt has been successfully uploaded
- After the receipt has been uploaded you may download it in the original format or as a pdf.
Disputing a Transaction
- Go to Transactions > Transaction Management.
- Search and select the transaction to dispute.
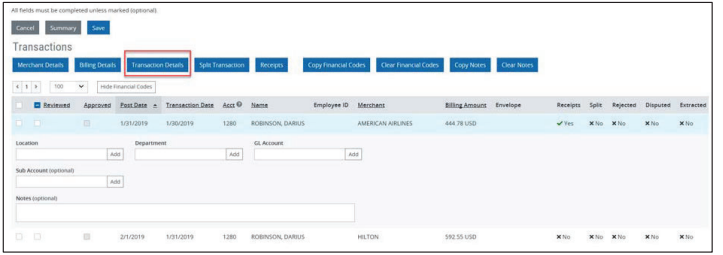
- Select Transaction Details.
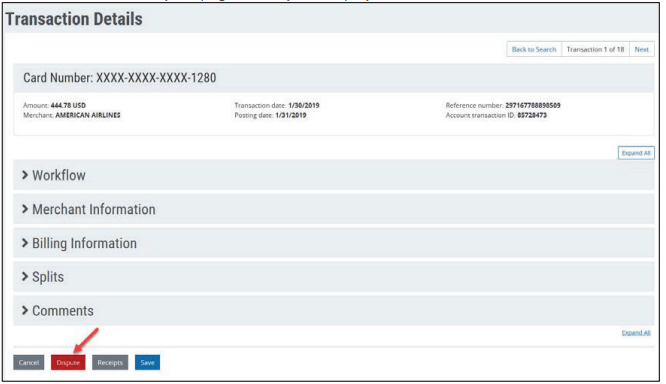
- At the bottom of the page select Dispute. Tip: Once you have clicked on Transaction Details, collapse all accordions to view your page the way it’s displayed below:
- Your screen will display a dispute form for you to fill out. Please enter all necessary information and click on Submit Dispute.
Note: You must dispute a transaction no later than 60 days after we send you the first bill on which the error or problem occurred.
Email Notifications
Notifications can be set up by any user with access to a card. If cardholders/proxies are set up with login access to ActivePay, they can set up their own notifications for any card accounts that are assigned to them.
- Navigate to Security > Notifications.
- Cardholders may set up notifications within ActivePay for their own card. The two notification types of most use to the cardholder are:
- Review – This will notify when a transaction has posted and is ready for review and coding.
- Statement – This will email a statement for the assigned card the day after the billing cycle ends.
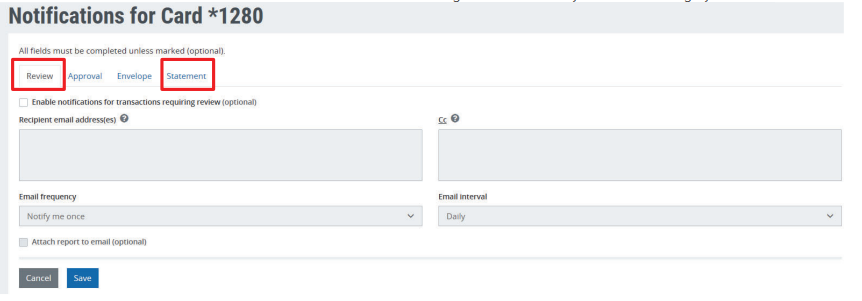
- Click on the “Enable notifications for transactions requiring review” checkbox.
- Enter the email address to receive the notification, cc email address (if desired). You may enter multiple email addresses by using semi-colon (;) as a delimiter.
- Email frequency
- Notify me once – the email recipient will receive one notification. This is the only option for Statement notification.
- Notify me until resolved – the email recipient will continue to receive emails at the selected Email interval until action is taken, i.e. in the case of review transaction notification, the user will continue to receive email notifications at the selected Email interval until the transaction is reviewed.
- Email Interval –
- Review and Approval - Daily, Weekly
- Statement – At Cycle
- Click Save. Please note that you must click Save on each notification type in order for it take effect.
IMAGE
Approver
RIT does not currently use the approver workflow functionality in PNC ActivePay (3/1/19)
If your organization has opted to use Approval, there are two ways this can be accomplished. The first is through Workflow, the second is through Transaction Management.
Transaction Approval
Workflow Items.
- When you are enabled as a Transaction Workflow Approver, your administrator team will set you up for email notifications when there are items for your approval. The frequency of these notices are Immediately, Daily, and Weekly.
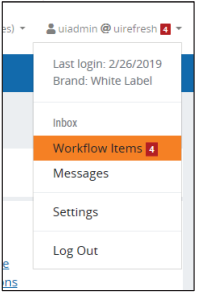
- When accessing ActivePay to perform the approval the number of items pending approval will show in the right corner beside your username. Hover over the username to access the Inbox > Workflow Items.
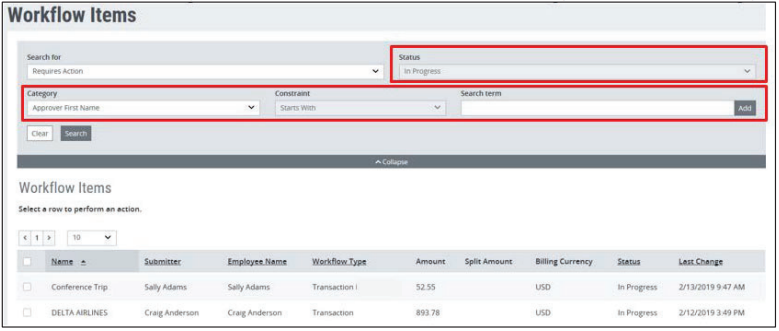
- The default search at the top will take you straight to the items In Progress that you must approve or reject. If there are many items, you can use additional search options such as First or Last Name, Transaction Amount, and Date ranges. Further, the headers that are underlined in the grid can be used for sorting.
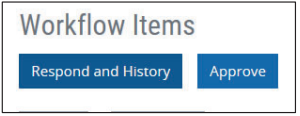
- Select an item, two choices are available:
- Respond and History – used to review the coding and other details
- Approve – If you know of the item, you may approve from this screen.
- Typically you will click Respond and History, then Open Transaction Management.
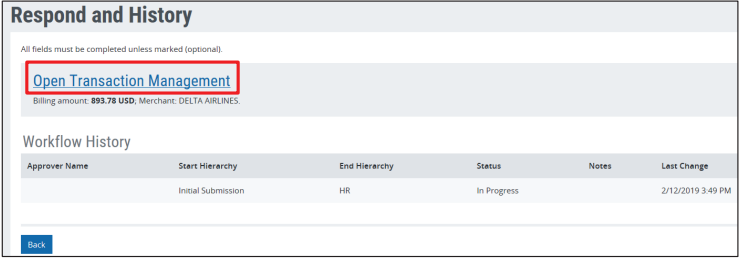
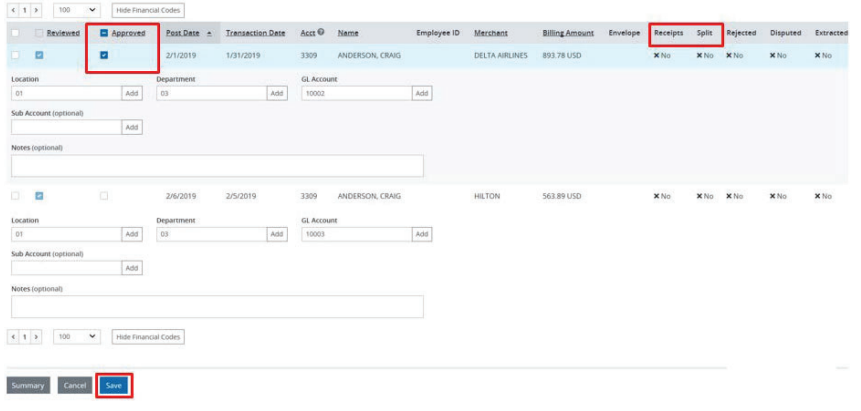
- Scroll to review the transactions and the financial coding. If the transaction is split, there will be a green checkbox under “Split” on the right side of the page. If a receipt is attached, there will be a green checkmark under the “Receipts” on the right side of the page.
- To view any splits, you must highlight the transaction, then click Split Transaction, or Transaction Details.
- Once the transaction coding is reviewed for accuracy, check the Approved box next to the transaction, then Save at the bottom. If all transactions are correct, then check the top-most Approved checkbox to select all, then Save at the bottom.
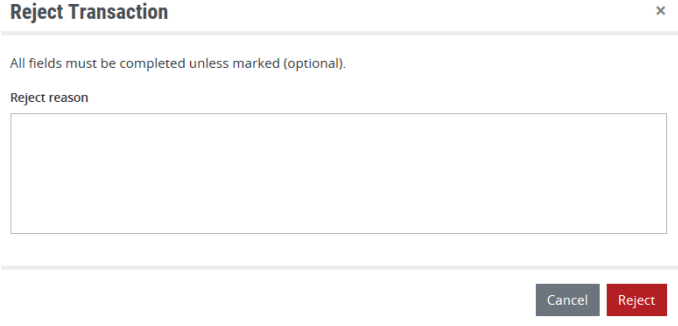
- If an item is not correct, it should be rejected. To reject an item, first select it from the list by clicking on it, then click Reject Transaction.
- A pop-up requiring a reject reason will appear. Enter the information the cardholder will need to correct and resubmit, then click the red Reject button.
- The item will be sent back to the cardholder, and they will be notified via email. Once corrected, they will mark the item as reviewed and send it back for approval.
- Once all items are approved/rejected, there is nothing more to do until the next notice is received.
Transaction Management
- When you are enabled as a Transaction Management Approver, your administrator team will set you up for email notifications when there are items for your approval. The frequency of these notices are Immediately, Daily, and Weekly.
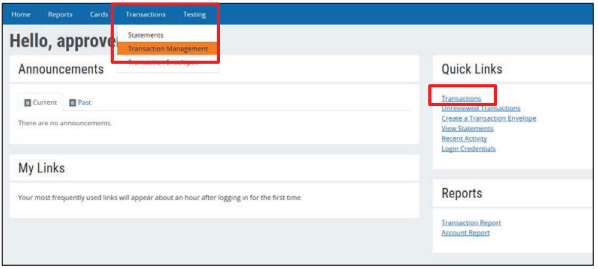
- When accessing ActivePay to approve items, go to Transactions > Transaction Management on the top toolbar, or click on Transactions under Quick Links.
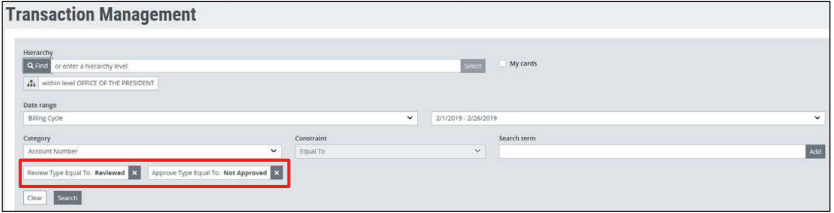
- For best results, enter the Search Criteria as follows to create your working queue of transactions requiring approval:
- Review Type – Equal To – Reviewed
- Approve Type – Equal To – Not Approved
- Scroll to review the transactions and the financial coding. If the transaction is split, there will be a green checkbox under “Split” on the right side of the page. If a receipt is attached, there will be a green checkmark under the “Receipts” on the right side of the page.
- To view any splits, you must highlight the transaction, then click Split Transaction, or Transaction Details.
- Once the transaction coding is reviewed for accuracy, check the Approved box next to the transaction, then Save at the bottom. If all transactions are correct, then check the top-most Approved checkbox to select all, then Save at the bottom.

- If the transaction is not coded properly, follow up with the cardholder for corrections.