Non-Financial Agreements (NFAs)
Novelution NFA Module
Introduction
This manual will guide RIT faculty and staff needing to request the following types of non-financial agreements (NFAs) related to their research endeavors. A downloadable copy may be found here - AdobeFile
The following types of NFAs are covered.
- Non-disclosure agreements (NDA)
- Data Usage Agreements (DUA)
- Materials Transfer Agreements (MTAs)
- Other NFA:
- Equipment agreements
- Teaming Agreements
- Memos of Understanding (MOUs)
RIT faculty and staff must complete the steps below, which include:
- Creating an NFA Request
- Completing the required information in the Primary Info panel
- Answering applicable compliance questions (similar to proposals)
- Uploading any necessary documentation
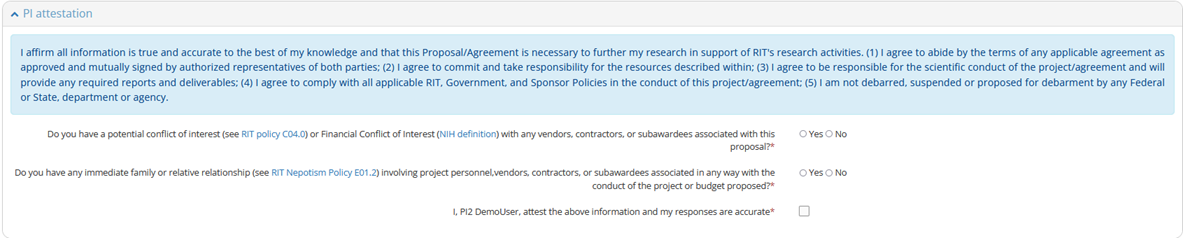
- Completing a PI attestation
- Submitting the request to SRS
This process will provide greater clarity to faculty and staff on the status of existing and outstanding NFA requests. Questions may be directed to postaward@rit.edu .
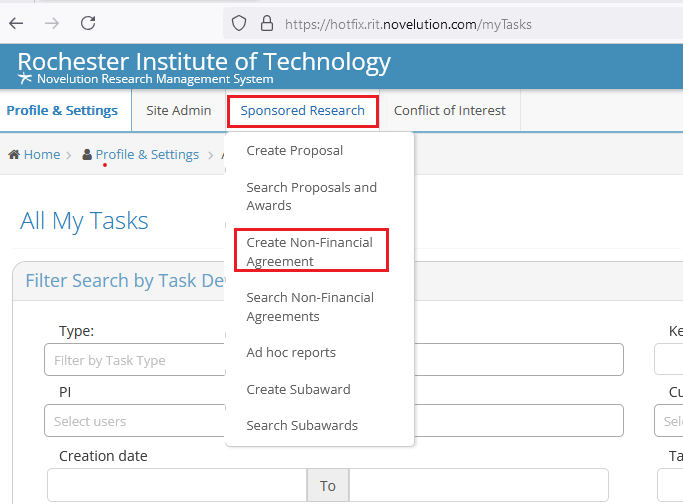
Step 1 - Initiate a Request
- Login to Novelution https://rit.novelution.com/login
- Navigate to the Sponsored Research tab
- Select Create Non-Financial Agreement
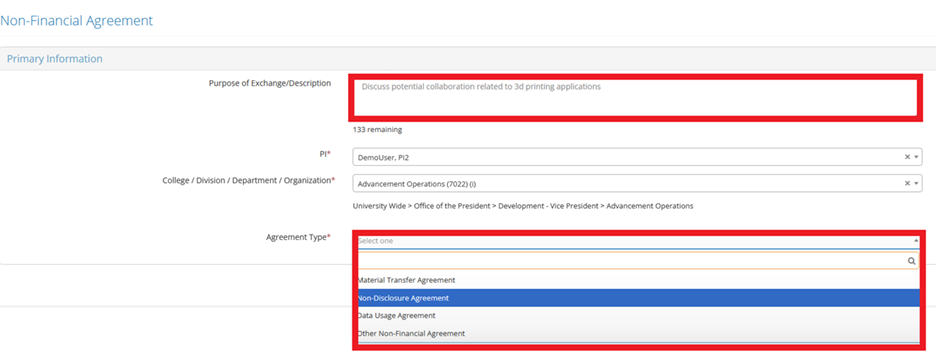
Step 2 - Enter Primary Information
- The Non-Financial Agreement main window will open
- Enter the Purpose of Exchange/Description
- If entering on behalf of someone, select the PI. Note: if entering yourself, this will automatically select your name
- The College/Division/Department/Organization field will auto-populate with the PIs home department.
- Choose the Agreement Type
- Select Continue
Step 3 - Entering NFA Requests
When entering Non-Financial Agreement requests, the process is slightly different among the various types of agreements. The default types are NDA, MTA, DUA, Other. Select the appropriate link below for instructions.
- Use this process when requesting a Non-Disclosure Agreement (NDA).
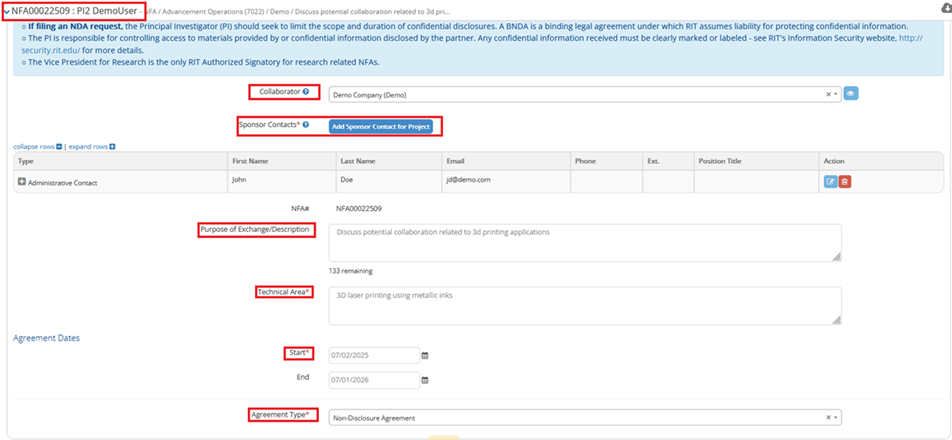
- A new NFA record will be created for your request. In the example used for this manual, the number is NFA00022509. You may use this number for the life of the agreement to reference your request and check the status of negotiations, expiration date, and to see any modifications.
- You must enter important information in the Primary Information panel
- Enter the name of your Collaborating Organization (change text in Primary Info Panel)
- If not in system, you will be directed to create a new sponsor
- When returned to Primary Information panel, select the blue Add Sponsor Contact for Project button. More detailed instructions may be found here - Add Sponsor/Collaborator
- Add at least one Contact so that SRS may reach out to the individual(s) for negotiating and executing the NFA.
- Select the contact Type
- Enter First Name
- Enter Last Name
- Enter contact’s Email
- Enter contact’s Phone, if known
- Enter an additional information you feel is pertinent in the Notes field
- Click the blue Save button
- Enter a Purpose of Exchange/Description if you did not in step 2
- Enter a Technical Area. Please be as specific as possible to limit any liability
- Enter a Start Date
- The End Date will default to 12 months from the start date. If you need an alternate date, please enter it.
- Verify the Agreement Type is correct
- The Primary Info window should look similar to the screen shot below
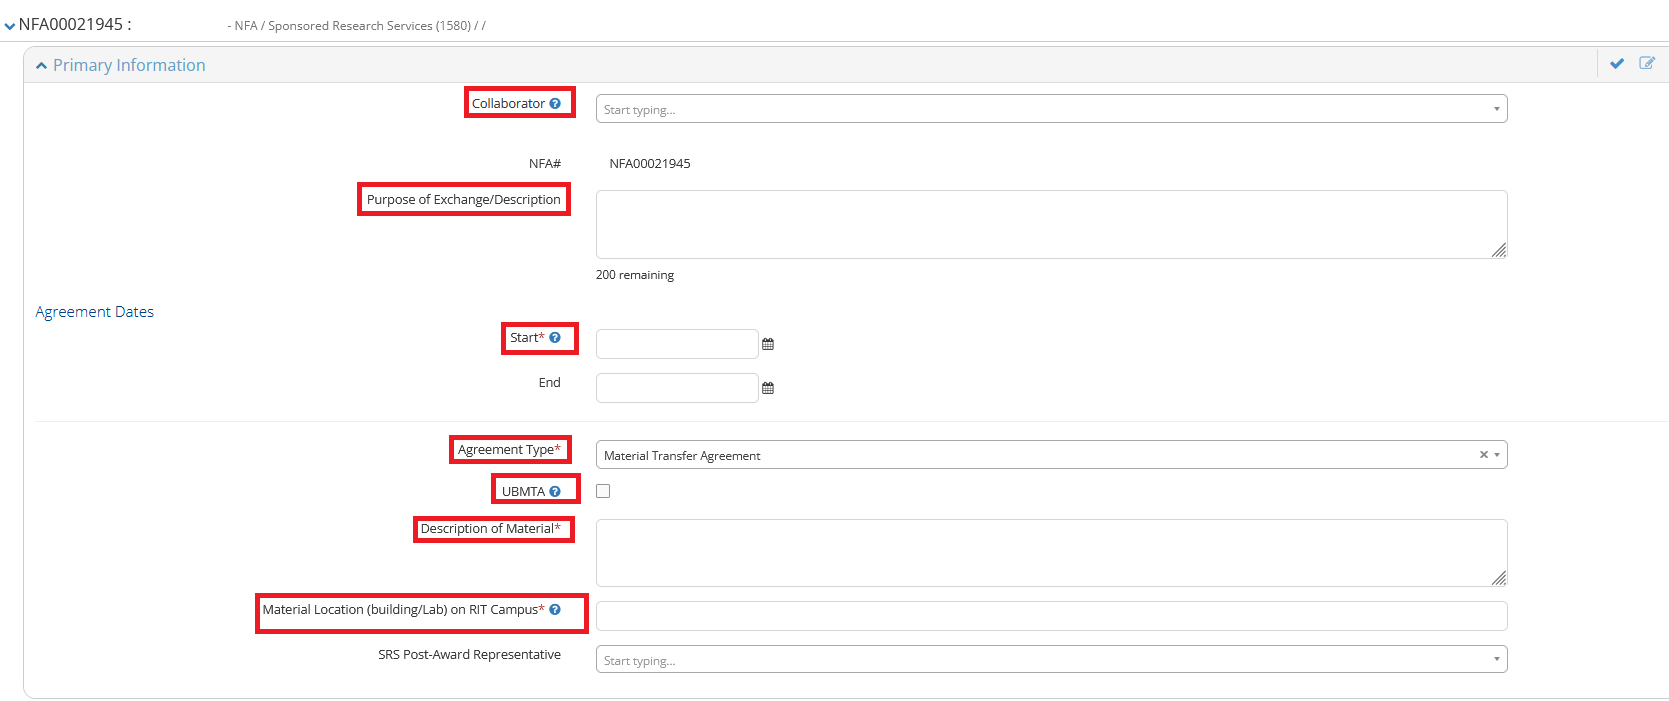
- A new NFA record will be created for your request. In the example here, the number is NFA00022509. You may use this number for the life of the agreement to reference your request and check the status of negotiations, expiration date, and to see any modifications.
- You must enter important information in the Primary Information panel
- Enter the name of your Collaboratoring Organization (change text in Primary Info Panel)
- If not in system, you will be directed to create a new sponsor
- When returned to Primary Information panel, select the blue Add Sponsor Contact for Project button. When returned to Primary Information panel, select the blue Add Sponsor Contact for Project button. More detailed instructions may be found here - Add Sponsor/Collaborator.
- Add at least one Contact so that SRS may reach out to the individual(s) for negotiating and executing the NFA.
- Select the contact Type
- Enter First Name
- Enter Last Name
- Enter contact’s Email
- Enter contact’s Phone, if known
- Enter an additional information you feel is pertinent in the Notes field
- Click the blue Save button
- Enter a Purpose of Exchange/Description if you did not in step 2
- Enter a Start Date
- The End Date will default to 12 months from the start date. If you need an alternate date, please enter it.
- Verify the Agreement Type is correct
- If the project is anticipated to be a Uniform Biological Material Transfer Agreement (UBMTA), select the check box UBMTA.
- This is most often used when materials being shared are biologic in nature.
- Enter a Description of Material, please be a descriptive as possible
- Enter Material Location on RIT Campus, be specific as possible by including the building and room number.
- The Primary Info window should look similar to the screen shot below
- A new NFA record will be created for your request. In the example here, the number is NFA00022509. You may use this number for the life of the agreement to reference your request and check the status of negotiations, expiration date, and to see any modifications.
- You must enter important information in the Primary Information panel
- Enter the name of your Collaboratoring Organization (change text in Primary Info Panel)
- If not in system, you will be directed to create a new sponsor
- When returned to Primary Information panel, select the blue Add Sponsor Contact for Project button. When returned to Primary Information panel, select the blue Add Sponsor Contact for Project button. More detailed instructions may be found here - Add Sponsor/Collaborator.
- Add at least one Contact so that SRS may reach out to the individual(s) for negotiating and executing the NFA.
- Select the contact Type
- Enter First Name
- Enter Last Name
- Enter contact’s Email
- Enter contact’s Phone, if known
- Enter an additional information you feel is pertinent in the Notes field
- Click the blue Save button
- Enter a Purpose of Exchange/Description if you did not in step 2
- Enter a Technical Area. Please be as specific as possible to limit any liability
- Enter a Start Date
- The End Date will default to 12 months from the start date. If you need an alternate date, please enter it.
- Verify the Agreement Type is correct
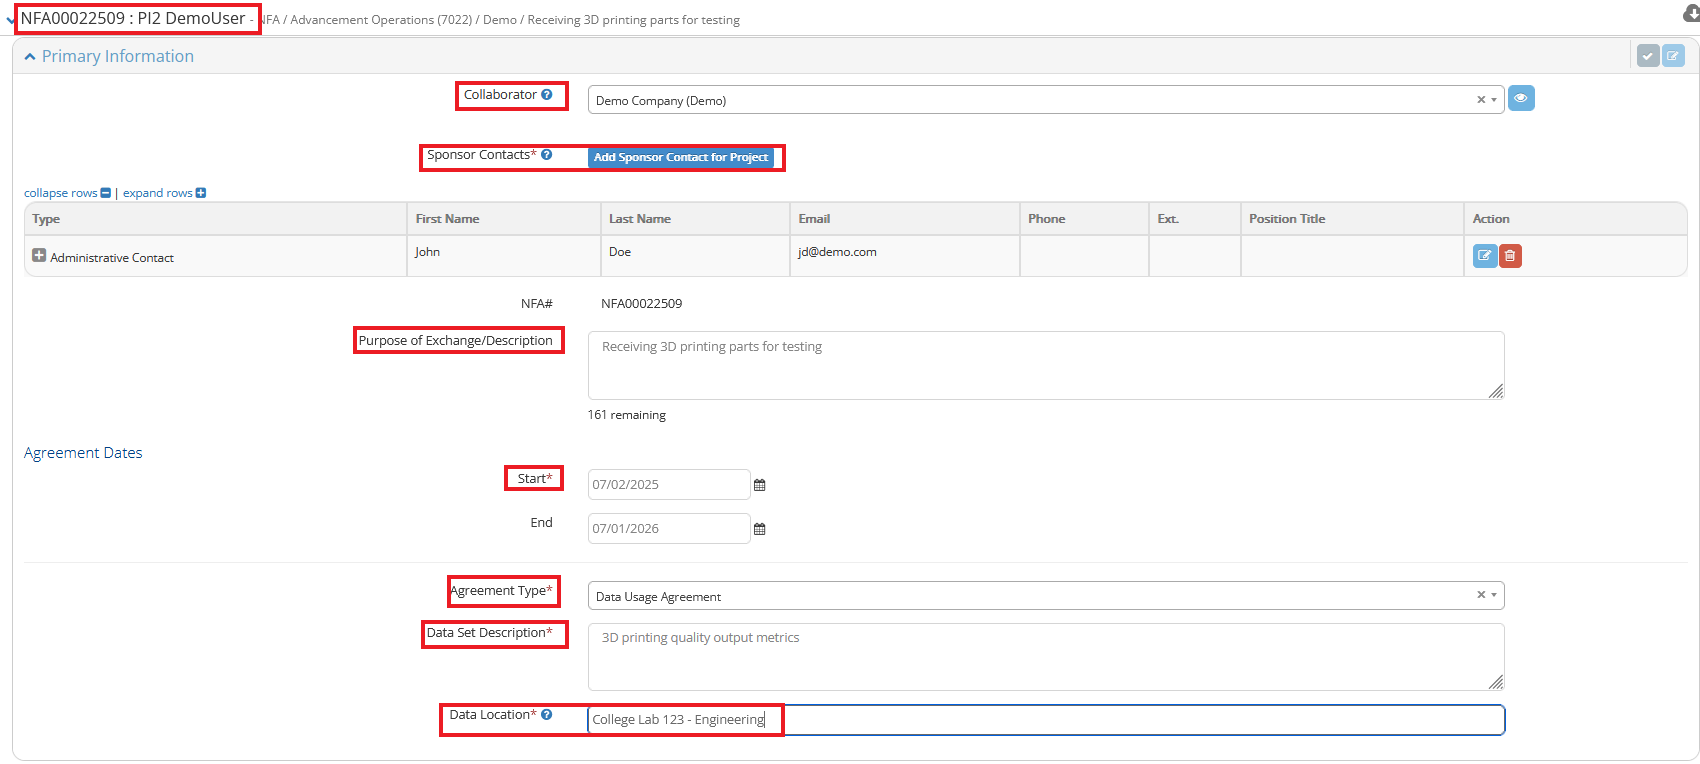
- Enter a Data Set Description
- Enter Data Location, be specific as possible by including the building and room number.
- The Primary Info window should look similar to the screen shot below
- A new NFA record will be created for your request. In the example here, the number is NFA00022509. You may use this number for the life of the agreement to reference your request and check the status of negotiations, expiration date, and to see any modifications.
- You must enter important information in the Primary Information panel
- Enter the name of your Collaboratoring Organization (change text in Primary Info Panel)
- If not in system, you will be directed to create a new sponsor
- When returned to Primary Information panel, select the blue Add Sponsor Contact for Project button. When returned to Primary Information panel, select the blue Add Sponsor Contact for Project button. More detailed instructions may be found here - Add Sponsor/Collaborator.
- Add at least one Contact so that SRS may reach out to the individual(s) for negotiating and executing the NFA.
- Select the contact Type
- Enter First Name
- Enter Last Name
- Enter contact’s Email
- Enter contact’s Phone, if known
- Enter an additional information you feel is pertinent in the Notes field
- Click the blue Save button
- Enter a Purpose of Exchange/Description if you did not in step 2
- Enter a Technical Area. Please be as specific as possible to limit any liability
- Enter a Start Date
- The End Date will default to 12 months from the start date. If you need an alternate date, please enter it.
- Verify the Agreement Type is correct
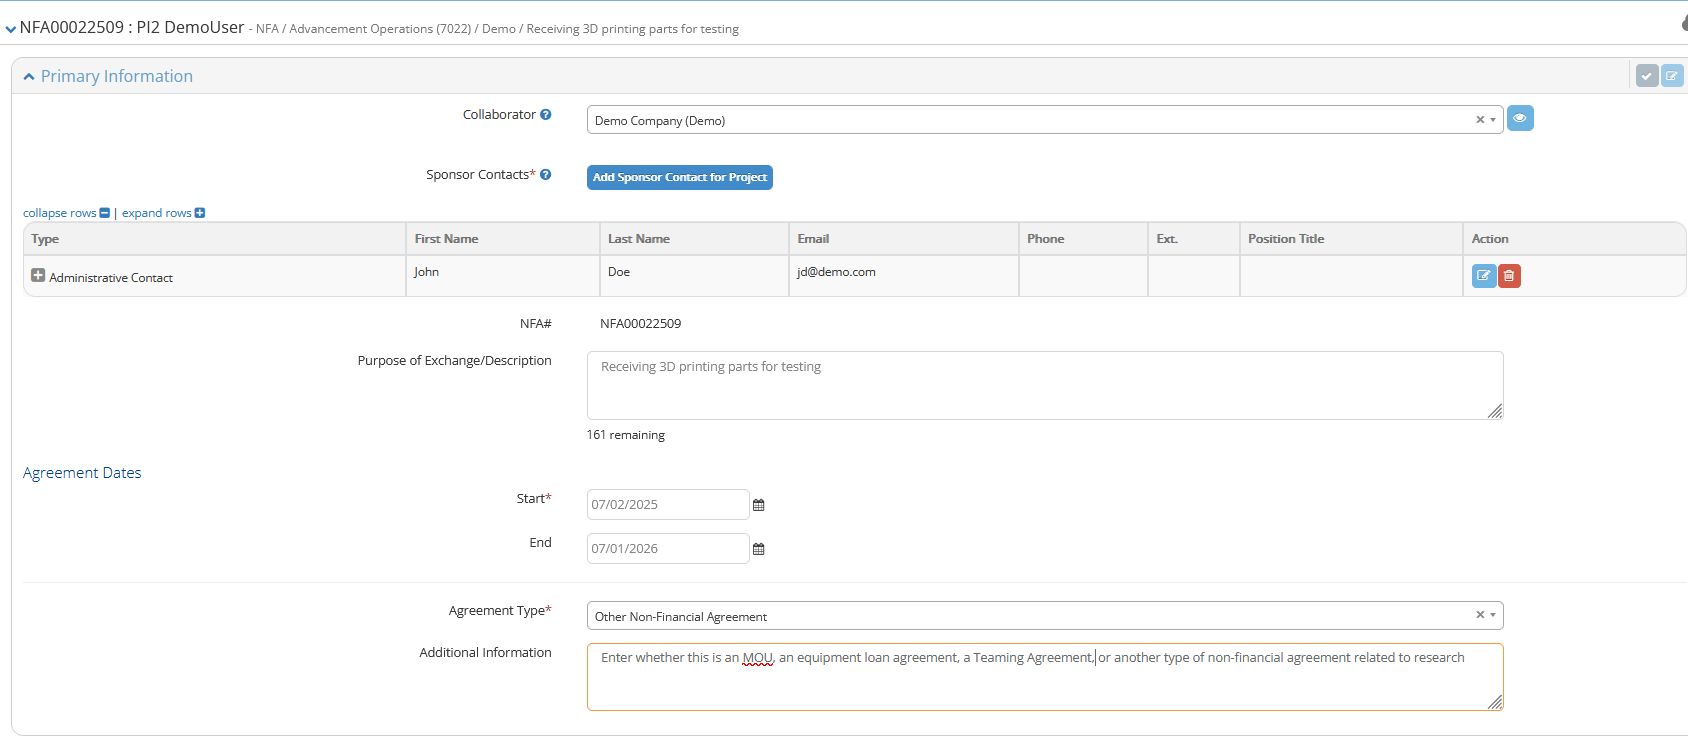
- In the Additional Information text field indicate the type of other NFA you are requesting, such as an equipment agreement, a Memo of Understanding, a teaming Agreement or something else.
- The Primary Info window should look similar to the screen shot below
Step 4 - Answering Compliance Questions
Compliance questions change depending on which type of agreement is being requested. MTAs and DUAs may involve hazardous materials and/or protected data. The compliance questions will ask for the PI to verify whether any of these apply and provide guidance on how to seek assistance. Some answers may require the requestor to seek assistance from Research Computing and/or Environmental Health and Safety (EHS). As always, questions may also be directed to postaward@rit.edu
- For NDAs and Other:
- Note: answering "Yes" may expand the questions and require additional inputs from the user.

- For MTAs:
- Note: answering "Yes" may expand the questions and require additional inputs from the user.
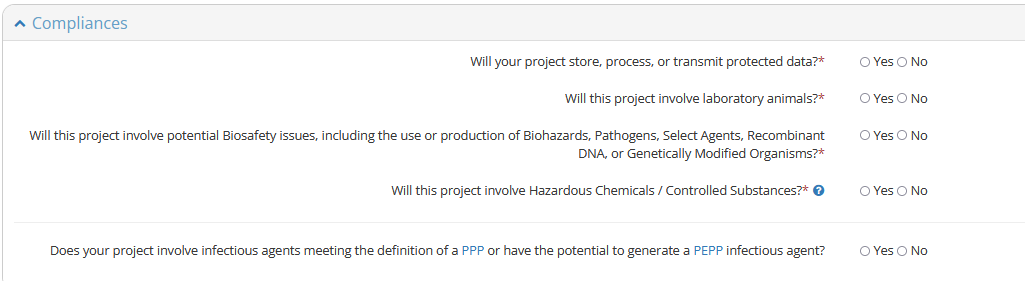
- For DUAs:
- Note: answering "Yes" may expand the questions and require additional inputs from the user.

Step 7 - Validation and Submission of NFA request
Once you have complete steps 1-6, you are ready to check for errors and submit the NFA request.
- At the bottom of the browser window, you will see the three buttons as represented in the screen shot immediately below.
- Press the blue Save button at the bottom of your screen
- Then select the green Check Validations button
- If there are errors, please correct and Check Validations again.
- If there are no errors, select the blue Submit for Approval button

Step 8 - SRS processing
Once the NFA request has been submitted, SRS will be notified of your request and someone in our office will be assigned to your NFA. You may login to Novelution and search for your NFA record to check status at any time using the Search Non-Financial Agreements window. Any NFAs on which you are involved will appear in the results at the bottom of the screen.